Blossoming Beauty: Step-by-Step Guide to Rose Nail Art
Introduction:
Rose nail art has gained popularity as a creative and beautiful way to adorn nails with intricate floral designs. While it may seem daunting, breaking down the process into step-by-step instructions can make it more achievable for nail art enthusiasts. This article will guide you through the process of creating stunning rose nail art, highlighting the attention points and addressing why people choose to engage in this artistic endeavor.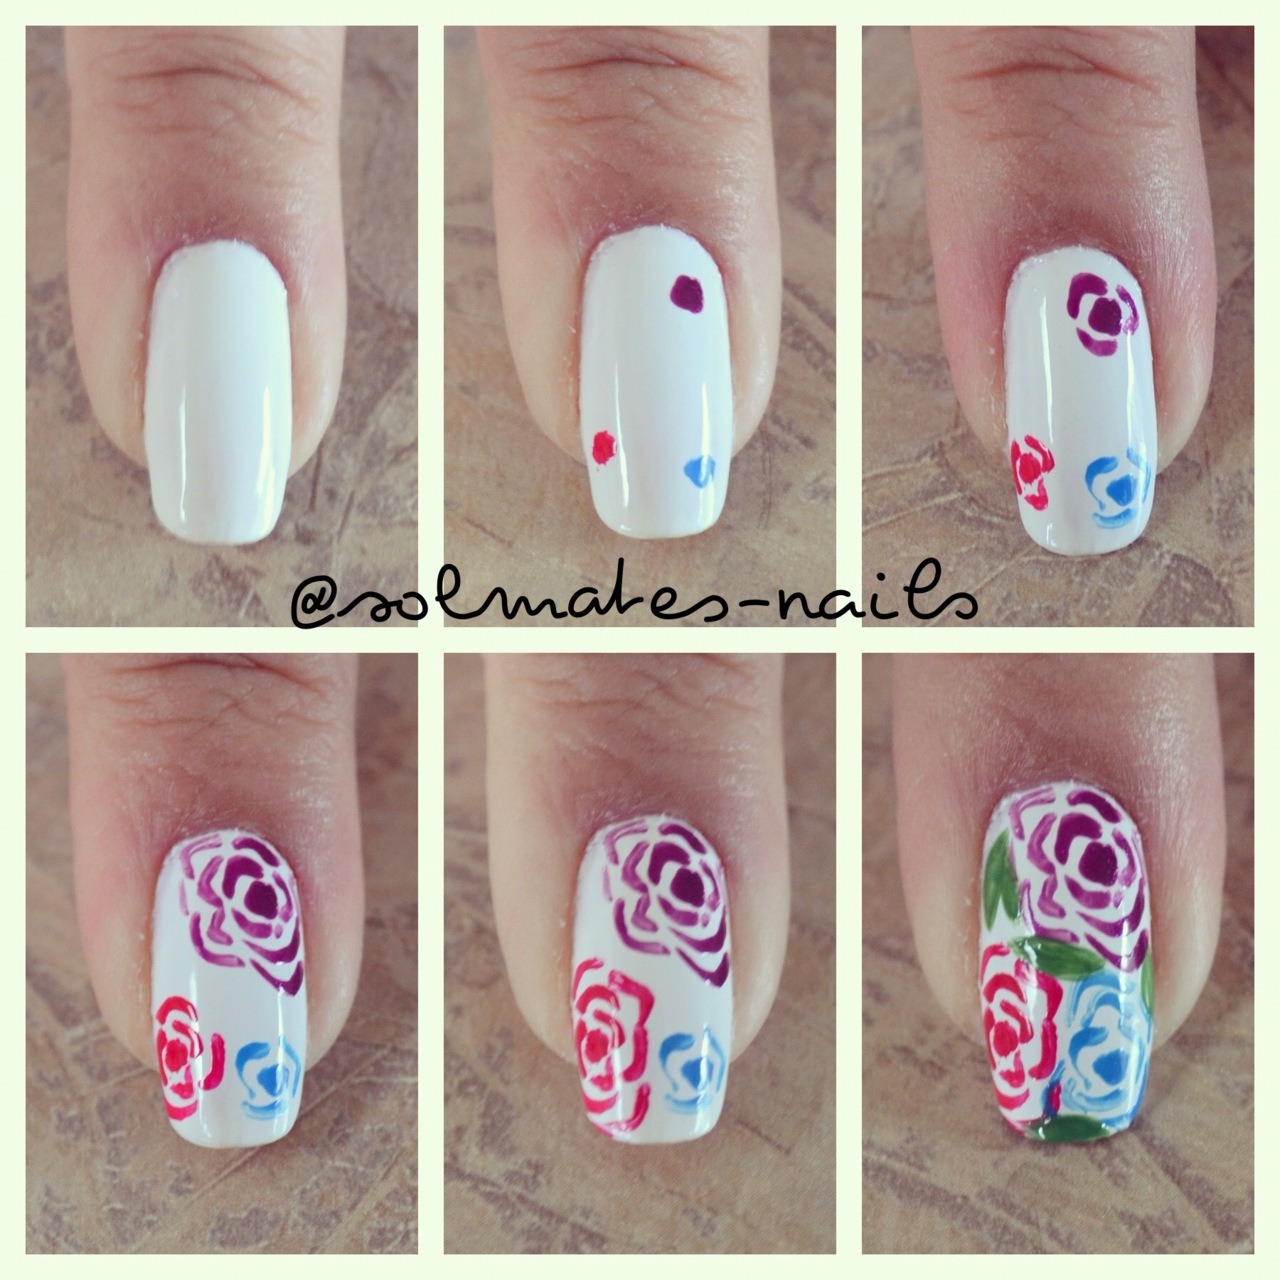
Step 1: Prep and Base Coat:
Start by preparing your nails. Trim, shape, and gently buff them to create a smooth canvas. Apply a base coat to protect the natural nails and provide a smooth surface for the nail art. Allow the base coat to dry completely before moving on to the next step.
Attention Point: Ensure the nails are clean and free from any oils or residue before applying the base coat for better adherence and longevity of the nail art.
Step 2: Base Color:
Apply a layer of your chosen base color polish. Popular choices for rose nail art include soft pinks, pastel hues, or neutral tones. Allow the base color to dry completely.
Attention Point: Apply thin and even coats of polish to avoid streaks or clumps in the final design. Allow each layer to dry fully before proceeding.
Step 3: Rose Petals:
Using a thin nail art brush or a dotting tool, start creating the rose petals. Begin with a small dot of a contrasting color at the center of the nail. Then, using short strokes, create curved lines radiating outwards from the center. Gradually build up the petals by adding more strokes around the center, forming the shape of a rose.
Attention Point: Be patient and take your time to create the petals. Start with lighter pressure and gradually increase it as you add more strokes to achieve a natural and realistic appearance.
Step 4: Detailing and Shading:
To add depth and dimension to the rose, use a darker shade of the petal color to outline and shade the petals. Apply thin lines or dots along the edges of the petals, creating definition and shadows. Blend the darker shade into the base color for a seamless transition.
Attention Point: Use a light hand while adding shading and detailing to avoid overpowering the delicate appearance of the rose. Blend the colors gently for a soft effect.
Step 5: Leaves and Stem:
To complete the rose design, add leaves and a stem. Use a thin brush or a dotting tool and a green polish to create the leaves. Begin with a small dot near the base of the rose and then use short strokes to create the leaf shape. Continue adding leaves on either side of the rose, forming a balanced and natural arrangement.
Attention Point: Vary the size and angle of the leaves for a more realistic look. Ensure the leaves are symmetrical and well-placed to enhance the overall aesthetic.
Step 6: Top Coat:
Once the design is complete and has dried thoroughly, apply a high-quality top coat to seal and protect the nail art. This will add shine, prolong the durability, and prevent chipping.
Attention Point: Apply the top coat with care, ensuring complete coverage over the entire nail and design. Avoid dragging the brush to prevent smudging or distorting the rose design.
Is It Difficult?
Creating rose nail art requires patience and practice, but it is not inherently difficult. With a steady hand and attention to detail, individuals can achieve stunning results. The key is to start with simple designs and gradually build confidence by mastering the techniques. As with any skill, continued practice will yield better and more refined results.
Why People Choose to Do It?
People choose to engage in rose nail art for several reasons. Firstly, it allows individuals to showcase their creativity and personal style through their fingertips. Rose nail art offers a unique and artistic way to express oneself. Additionally, DIY nail art provides a cost-effective alternative to salon visits, empowering individuals to achieve professional-looking results at home. Lastly, many find the process of creating rose nail art relaxing and therapeutic, offering a chance for self-care and creativity.
Conclusion:
Embarking on the journey of rose nail art may seem intimidating at first, but breaking it down into step-by-step instructions can make it more approachable. By prepping the nails, applying a base color, carefully creating the rose petals, adding detailing, incorporating leaves and stems, and sealing it all with a top coat, individuals can achieve stunning rose nail art. Though it requires practice, the process offers a creative outlet and an opportunity for self-expression. Whether for a special occasion or simply to indulge in artistic self-care, rose nail art allows individuals to display their unique style and creativity on their fingertips.